It will be more elegant next year (see "Future" below), but here's how it went.
Project
The video really says it all. When someone reaches in the cauldron for candy, the cauldron shrieks/laughs/says boo/howls/etc, A distance sensor detects the hand, and code on the Arduino then plays one of 9 sounds stored on an SD card at random, through an amp to a speaker. That's it.
Problems
The only real issue I had was with the sound files. It took me a while to diagnose because I had some other dumb things going on at the sane time, but the key is that the TMRpcm library I used is fussy about file formats. See the "Software" section below--basically, I had to download a free sound editing program and convert the files to a format that worked.
Also, I cooked an amp (not sure how, but there was smoke). When I installed the replacement it didn't work, Then I noticed a blob of solder where it shouldn't be (probably my fault--left from when I soldered the headers and terminal block). I got out my soldering iron and solder sucker, removed the blob, and it worked fine.
I don't know if my problem with the PIR sensor was me or the sensor. I have a replacement that I will try when I have time--for next year, anyway--but the ultrasonic distance sensor worked fine, so that't what I used.
I did have to work on the code to find the right value to test for from the sensor, but that is to be expected (see "Software" below).
I used the Adafruit Class D Mono amp because my DIY amps were not loud enough. It's very inexpensive, reduces complexity, and takes less space (but does require a little soldering).
Cost/Skills
Cost depends on what you have on hand. Assuming that you have an Arduino, a usable speaker, and the support stuff like wire, batteries, breadboard, SD cards, etc., the rest of what you need should cost under $15.You may have some of the other components, and that would bring the cost down. If you don't have an Arduno, you can buy an UNO for ~$18. Smaller boards are less expensive (as low as $5), but you may need to do some soldering and you may miss some features (and necessities like cables to connect to the IDE on your computer).
This project does not require a lot beyond a basic understanding of how an Arduino works. It's probably possible to buy all the components and get this to work. However, if you don't know what the Arduino IDE is, for example, you might want to read up a little. I recommend that anyone who is new to Arduino and/or microcontrollers get a starter kit like
this or
this or
this, and find some tutorials like
Jeremy Blum's or
the Adafruit Learning System. I got mine for Christmas last year and I'm having a ball!
What you'll need
- Cauldron: (I got mine from CVS for $1.99)
- Arduino Uno: (I'll use a smaller board next year, like an Adafruit Pro Trinket)
- Arduino IDE
- Seeed Studio SD shield: (worked fine, but I'll use a breakout next year to conserve space--like this one)
- Adafruit Class D Mono Amp: (I tried two DIY amps--one with complementary NPN/PNP transistors and one with an LM386 IC, but neither was loud enough. The Adafruit amp for $3.95 is plenty loud, takes up much less space, and has many fewer connections).
- HC-SR04 distance sensor: (I could have used a PIR motion sensor, but I think the one I had wasn't working, and the distance sensor worked so I stuck with it)
- Speaker: I harvested a 4" 8Ohm speaker from a clock radio that had an issue with a power surge; any speaker that works with your amp will do (4-8Ohms for the Adafuit)
- Audacity (or similar) for editing sound files (see "Software" below)
- Half-size Breadboard
- Hook-up wire
- SD Card that fits (I used an 16G standard size for this shield)
- 9V Battery
- Snap connector with 2.1mm jack: I bought a jack at Radio Shack and soldered it to a snap connector that I had
- Utility knife for cutting the cauldron
- Maybe a soldering iron and basic soldering skills, but this can be done without any soldering.
- Small project enclosure (if you decide to go the whole way; in that case you'll also need a drill to make holes in the enclosure to connect to power, the sensor, and the speaker)
Circuit
Wiring
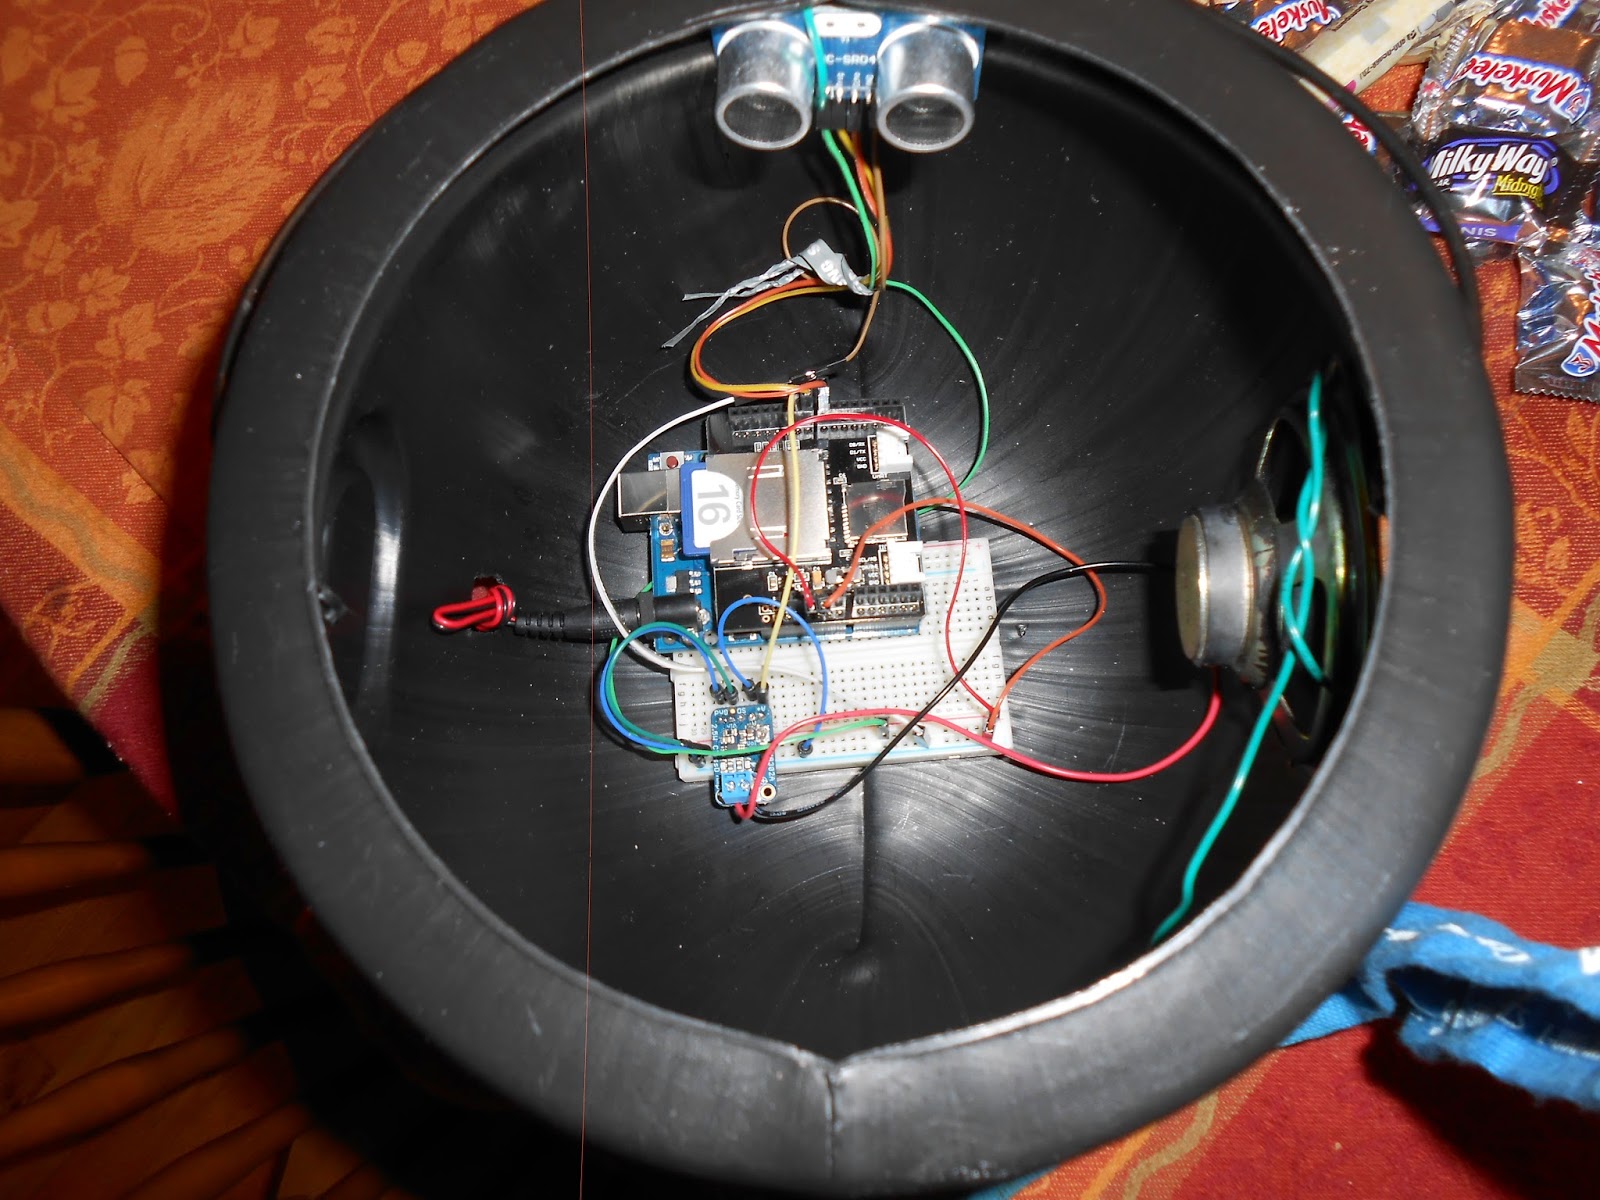 |
| HC-SR04 at top, speaker on right, amp on breadboard, sd shield stacked on Arduino Uno |
Speaker: the leads go to the corresponding connections on the amp. I soldered the terminal block to the amp, so my speaker connects there.
HC-SR04
4 pins: 5V and GND to 5V and GND
Echo and Trigger Pins to digital pins as defined in sketch (I used D7 and D8, respectively).
Amp:
speaker as above
A+ pin goes to the speaker pin (Digital 9 in my sketch)
A- to GND
Vin to 5V rail
GND to GND
SD
The shield just stacks on the UNO's headers.
For a separate breakout there are 6 connections: the 4 SPI connections (CS to CS as defined in the sketch--mine is Digital 10, MOSI to D11, MISO to D12, CLK to D13), 3.3V rail, and GND.
Note that some smaller boards only operate at 5V or 3V logic. In another application, I used a 3V Pro Trinket, powered the SD from 3.3V on the Trinket and powered the Trinket and all other components off the battery.
If you have a 5V board, you may need a voltage regulator and a logic level shifting board to get the SD card to work (a solution to that is the
Adafruit board that can handle 5V--more expensive, but less work).
Arduino
9V to barrel jack
5V to breadboard + rail
GND to breadboard - rail
Other pins are connected as described for individual components:
D9 to amp A+
D7 & D8 to HC-SR04 Echo and Trigger
For the SD Shield, all Arduino pins for SD are handled by stacking the shield, but (only) if you're using an SD breakout board:
D10 to CS, D11 to MOSI, D12 to MISO, D13 to CLK, 3V to power in
 |
| Close-up (a little fuzzy) view of amp and Arduino |
Software
I used the Arduino TMRpcm library to play the sound. First, I needed sounds, so I went to
http://caseyscaverns.com/4/halloween5.html and downloaded some sounds (I selected 9). I discovered that TMRpcm wants specific formats and sampling rates (check the
wiki). I had do download
Audacity and use it to convert to 16Khz sampling rate and 8-bit PCM wave format. Once I did all that, I copied the files to the SD card.
The Arduino code checks the distance sensor, which returns time for a roundtrip of the sound in milliseconds. Since sound travels 29.1 cm/ms dividing by 29.1 yields cm per round trip. Since we only care about the one-way distance, we divide that by two. In my case, the cauldron is about 15cm wide, so I checked for <12cm (meaning that if it finds something closer than that, it's probably someone reaching in for candy.
The Serial stuff allows me to use the serial monitor for debugging. I first had the distance sensor set at 16cm and that caused it to always see the other side. Using the serial monitor showed me what was going on--it was returning 15cm every time, always <16, so it always played a sound.
The random function returns a number from 1 to 9, and the sketch requests one of the 9 sounds accordingly. I have a long if/elseif construct to do this.I wanted to put the filenames in an array and just reference the one I want using the random number as an index, but the IDE did not like that. I also tried a switch/case construct that did not work. I'm sure I did something dumb in one or both of those cases. This code works, but I have more stuff to investigate.
/*******************Arduino Sketch*******************/
/*2014-10-05
Halloween Candy Cauldron: Play random sound when someone reaches in for candy
*/
/*2014-10-05 HC_SR04 Distance sensor code added
Needed to modify pins for Halloween (13&12 used by SPI)
2014-04-26 Downloaded from Instructables
HC-SR04 Ping distance sensor]
VCC to arduino 5v GND to arduino GND
Echo to Arduino pin 13 Trig to Arduino pin 12 (used 8&7 instead)
*/
/*includes*/
#include <Wire.h> //SPI
#include <SD.h> //need to include the SD library
#include <TMRpcm.h> //library for playing sound
/*constants*/
#define SD_ChipSelectPin 10
#define trigPin 8
#define echoPin 7
/*variables*/
int song = 0; // song number for random function
/*objects*/
TMRpcm speaker; // create an object for use in this sketch
void setup(){
randomSeed(analogRead(0)); //initialize random (A0 unconected)
pinMode(trigPin, OUTPUT); //pins for distance sensor
pinMode(echoPin, INPUT);
speaker.speakerPin = 9; //output to amp
speaker.loop(0); //2014-10-05 do not play repeatedly
Serial.begin(9600);
if (!SD.begin(SD_ChipSelectPin))
{ // see if the card is present and can be initialized:
Serial.println("SD not initialized");
return; // don't do anything more if not
}
else
{
Serial.println("SD initialized");
}
speaker.volume(1); //may make it louder
}
void loop() {
long duration, distance;
digitalWrite(trigPin, LOW);
delayMicroseconds(2);
digitalWrite(trigPin, HIGH);
//trigPin must me high for 10 microsecs to do ranging
delayMicroseconds(10);
digitalWrite(trigPin, LOW);
//duration is the time between pings of the sensor in microseconds as returned on echoPin
duration = pulseIn(echoPin, HIGH);
//duration is a round-trip, so divide by 2; speed of sound is 29.1 cm/microsec, so distance is in cm
distance = (duration/2) / 29.1;
//2014-10-05 If distance is <6in (~16cm) someone put his hand in
//2014-10-20 12cm works better in the cauldron I bought
if (distance < 12)
{
song = random(1,10); //get random number from 1 to 9
Serial.print("song: "); //for debugging
Serial.println(song); //for debugging
if (song == 1) {
speaker.play("1.wav");
} else if (song == 2 ) {
speaker.play("2.wav");
} else if (song == 3 ) {
speaker.play("3.wav");
} else if (song == 4 ) {
speaker.play("4.wav");
} else if (song == 5 ) {
speaker.play("5.wav");
} else if (song == 6 ) {
speaker.play("6.wav");
} else if (song == 7 ) {
speaker.play("7.wav");
} else if (song == 8 ) {
speaker.play("8.wav");
} else {
speaker.play("9.wav");
}
// case 1:
// sound = songs[song];
// Serial.println(sound);
// speaker.play("5.wav");
delay(5000);
}
Serial.print(distance); //for debugging
Serial.println(" cm"); //for debugging
delay(50);
}
/*************************end sketch**********************/
Cauldron
Since I didn't have the circuit enclosed, I put the Uno with the SD shield stacked on it, and the breadboard with the Amp plugged into it, at the bottom of the cauldron. I fixed the HC-SR04 under the lip of the cauldron top using hookup wire. The cauldron was black and has circles for faux handles on the sides, so I cut one of those out and fixed the speaker facing out with hookup wire. After making the connections as described above, I cut out a circle of cardboard for the candy to rest on while protecting the speaker. Aggressive hands had a tendency to pull the wires and disconnect them (hence the enclosure for next year).
I found that I needed the battery outside of the cauldron so I could detach it easily and also could swap out batteries as they drained. When the battery gets under 8V the circuit becomes erratic.That takes a few hours, depending on the battery quality.
One note: if the candy is piled too high, the sensor detects it and always returns a value less than 12cm, so the sounds play repeatedly, not just when someone reaches in.
 |
| Cauldron with cardboard insert--note battery on left |
Future
Next year, I'll use a larger container. I will also use a project enclosure to protect the boards and wires. I'll use a Pro Trinket or the like with an SD breakout board. I may also try replacing the ultrasonic distance sensor with a PIR motion sensor. The sensor and the speaker will be external to the enclosure.
I'll also work on the power. I need access to the battery for changing, so it will probably stay outside. A switch would be nice, so I don't have to disconnect the battery to conserve power while the cauldron is idle.
Happy Halloween!
This was fun!


